Christmas Turkey Recipe
This post contains affiliate links. As an Amazon Associate I earn from qualifying purchases.
This Christmas turkey recipe doesn’t just taste incredible—it stops people in their tracks the moment it hits the table. I’ve been preparing holiday meals across Alaska for years, and I’ve learned that a golden, perfectly roasted bird with crispy skin and juicy meat is the centerpiece that makes everyone pause before they even taste it. The magic happens when you understand a few simple techniques: dry brining for flavor penetration, herb butter under the skin for color and moisture, and proper resting for texture. Here’s how to make a dish that looks as good as it tastes, and does it all in under four hours of active cooking time.
The Most Beautiful Christmas Turkey Recipe You’ll Ever Make (And It’s Easier Than It Looks)
I’ll never forget the Christmas when my grandfather pulled a golden turkey from his cabin oven in Southeast Alaska—the skin shimmered like polished copper, and my cousins actually gasped before we sat down to eat. That moment taught me something crucial: when you honor the ingredient and respect the process, presentation takes care of itself. This recipe builds on that philosophy. We’re not doing anything complicated. We’re simply giving this bird time, salt, and strategic herb placement so the skin achieves that burnished mahogany finish while the meat stays impossibly moist inside.
The Visual Elements That Make This Dish Stunning
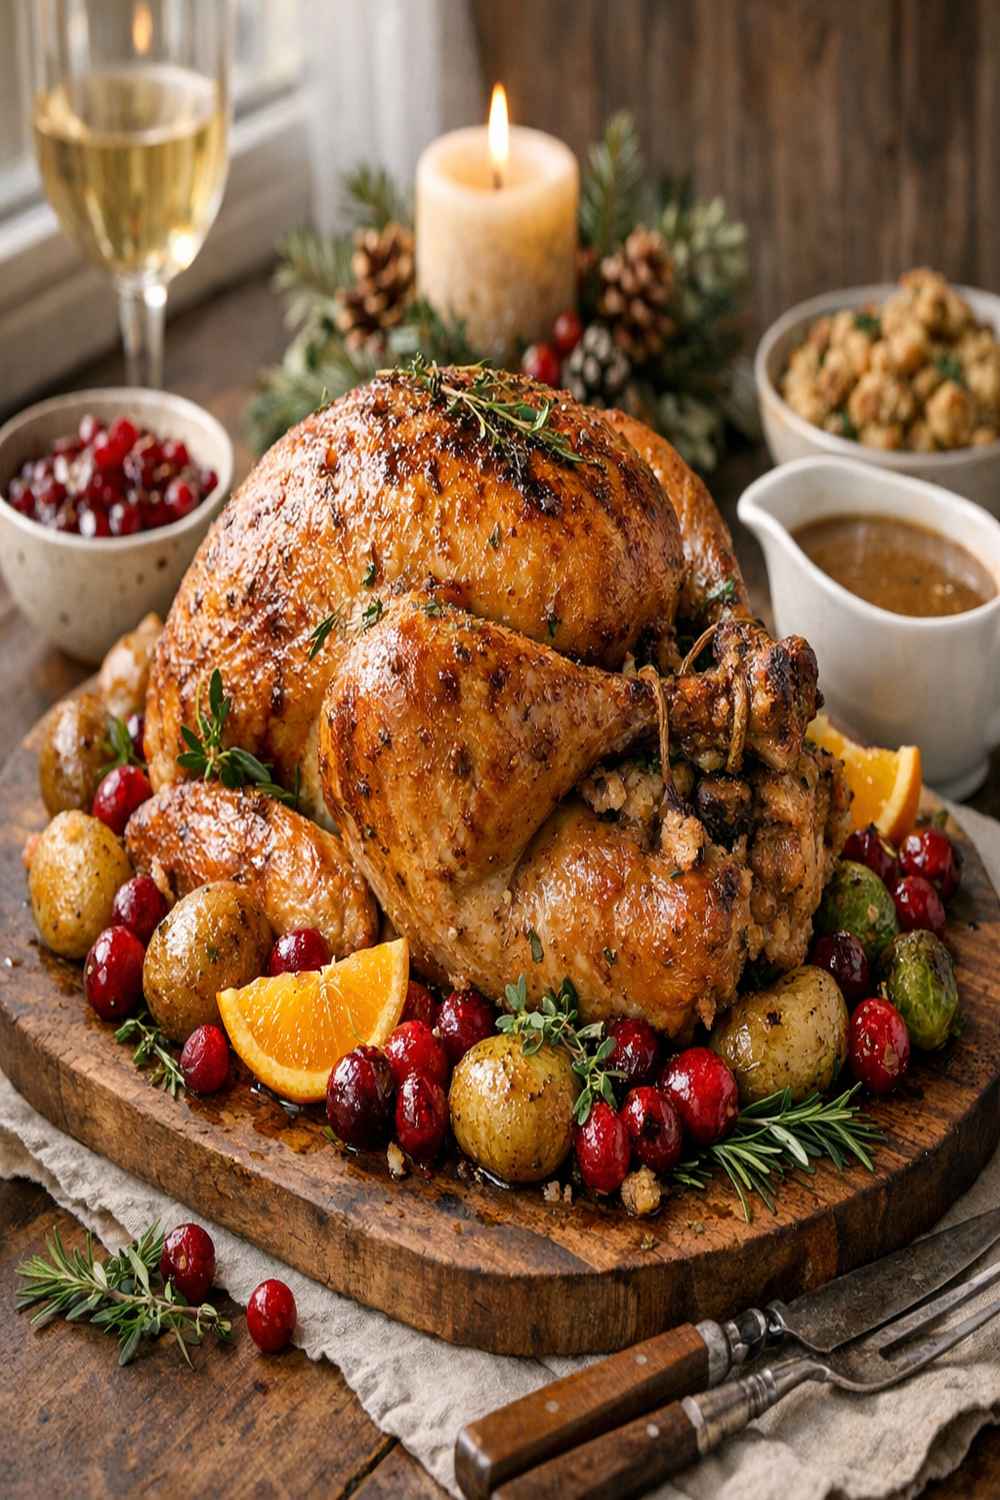
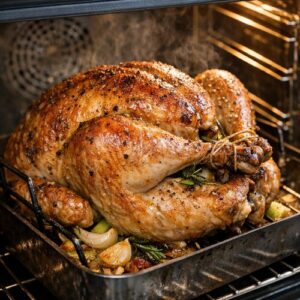
Before we even talk about flavor, let’s discuss what makes this turkey visually captivating. The color progression from deep golden-brown on the breast to rich caramel-mahogany on the thighs tells your guests this bird was roasted with precision. The herb butter creates subtle green flecks visible just under the translucent, crackling skin. The arrangement on a platter with pan juices pooling beneath it—that’s edible poetry.
- Golden-mahogany skin finish – achieved through proper oven temperature management and butter basting, signaling perfect doneness and moisture retention
- Crispy texture contrast – the crackling exterior against the herb-scented juicy meat visible at the carving point creates visual interest and textural promise
- Strategic herb visibility – flecks of parsley, thyme, and bay leaves peeking through the skin under the surface communicate freshness and intentional preparation
Choosing Ingredients for Maximum Visual Impact
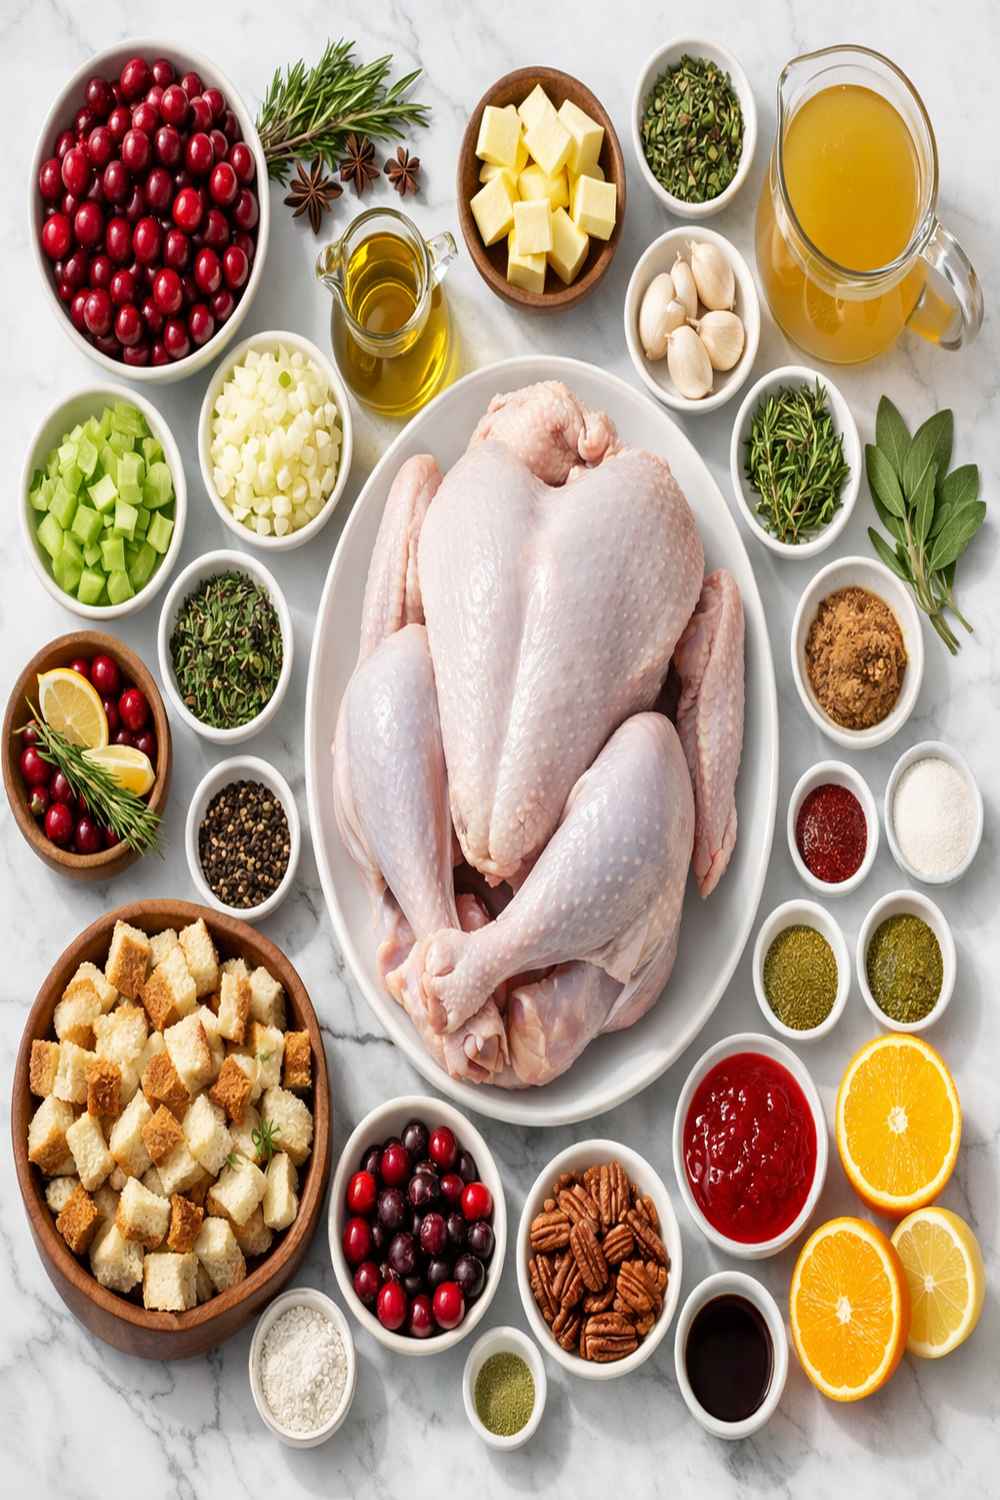
I approach ingredient selection like I approach wild Alaskan salmon—respecting the ingredient’s natural beauty and choosing supporting flavors that enhance rather than mask. For this turkey, we’re building layers of visual interest through strategic color and texture choices. The lemon halves inside create aromatic steam. The garlic and fresh herbs create color depth. The wine and soy sauce deepen the gravy to a luxurious bronze. Each ingredient earns its place on your table.
For the Turkey and Base
- large handful fresh thyme leaves (picked and chopped, plus extra sprigs for cavity and serving)
- 2-3 bay leaves (fresh if available, torn into smaller pieces for distribution)
- 1 large yellow onion (roughly chopped, skin left on for color extraction)
- 5-6 kg oven-ready whole turkey with neck and giblets included (choose a bird with unblemished golden skin for best visual appeal)
- 2 lemons (firm, unblemished, halved lengthwise for visual appeal)
- 2 teaspoons fleur de sel or fine sea salt (for 48-hour dry brine)
- 3 garlic cloves (freshly grated on microplane for finest texture and visible specks)
- 2 large carrots (roughly chopped into 2-inch pieces for roasting color development)
- large handful fresh parsley leaves (picked from stems, roughly chopped for bright green color)
- 150 g unsalted butter (cold, cut into pieces for easier distribution)
For the Gravy
- 1 tablespoon soy sauce (adds umami depth and bronze color to gravy)
- 1 large glass dry red wine, approximately 200 ml (choose a wine with medium tannins for best color)
- 1 teaspoon yeast extract (concentrated savory flavor and dark richness)
- 500 ml turkey or chicken stock (homemade preferred, adds collagen for silky mouthfeel)
- 2 tablespoons all-purpose flour (spooned and leveled)
How to Make Picture-Perfect Christmas Turkey Recipe
This isn’t about rushing. This is about creating edible art through intentional timing and temperature management. I’ve built this timeline so you can have everything ready 48 hours ahead, then execute the roasting with calm precision. The result is a bird that looks magazine-worthy and tastes like you’ve been cooking all day.
Step 1: Dry-Brine Your Turkey (48 to 12 Hours Before Cooking)
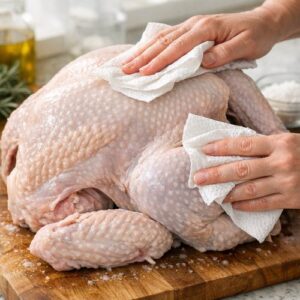
Remove your turkey from its packaging and pat it completely dry with paper towels—moisture is the enemy of crispy skin. This is where the visual magic begins. Gently lift the skin away from the breast meat with your fingers, working carefully to create a pocket between skin and meat on both sides. Work your way down toward the thighs if you can, but the breast is your priority. Once you’ve loosened the skin, sprinkle 2 teaspoons of fine sea salt evenly over the exposed meat, then pull the skin back down and smooth it carefully.
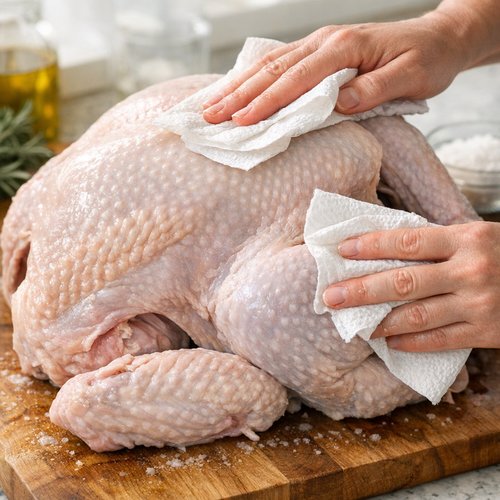
Season the entire exterior of the bird with additional salt, paying special attention to the thighs and the area where wings meet breast (these darker meat zones need more seasoning for proper flavor penetration). Place the bird breast-side up on a large roasting tin with raised sides—this becomes your roasting vessel. Leave it uncovered in the refrigerator. The uncovered time allows the skin to air-dry slightly, which is your secret weapon for achieving that crackling golden exterior. Your turkey is now seasoning and drying simultaneously, building incredible flavor throughout the meat.
Step 2: Prepare Your Herb Butter (1 Hour Before Cooking)
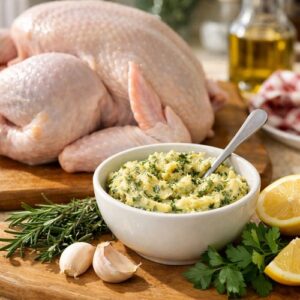
Remove your turkey from the refrigerator and place it on the counter to bring it closer to room temperature—this ensures more even cooking. While the turkey rests, prepare your herb butter. In a small saucepan over low heat, melt your butter gently. Once melted, add your grated garlic, chopped parsley, thyme leaves, and torn bay leaf pieces. Let this mixture sizzle gently for exactly one minute—this releases aromatic oils without cooking off the fresh herb color. Squeeze your lemon juice into the mixture, stir once, then remove from heat and set aside to cool slightly. You’ll notice the herbs retain their vibrant green color and the garlic becomes fragrant without browning. This is exactly what you want.
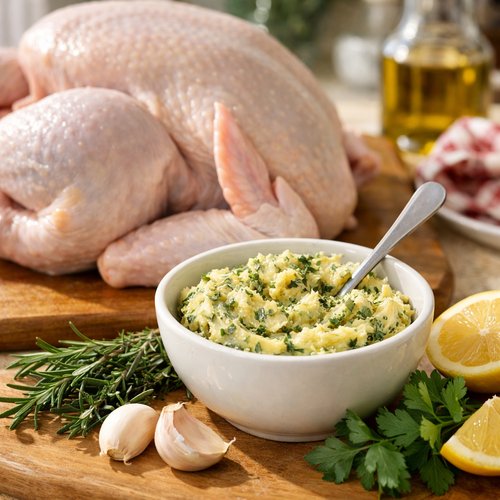
Preheat your oven to 240°C (220°C fan) or gas mark 9. This high temperature will be used briefly to start the browning process, then we’ll reduce it for gentle cooking. Think of it like how salmon cooks on Alaskan cedar planks—we start hot to create that caramelized exterior, then shift to gentle heat for moisture retention.
Step 3: Build Your Roasting Base (30 Minutes Before Cooking)
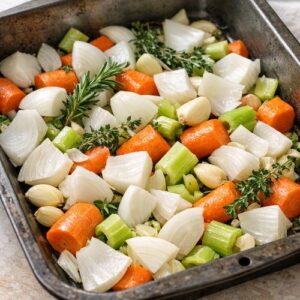
Remove the turkey from the roasting tin and set it temporarily on a clean surface. Scatter your roughly chopped onion, carrot pieces, and the chopped turkey neck into the bottom of your roasting tin. These become your flavor foundation and will eventually enrich your gravy with deep, roasted vegetable notes. Place a sturdy roasting rack, trivet, or ovenproof cooling rack directly into or over your roasting tin. This elevates your turkey above the vegetables, allowing air to circulate underneath for even browning.
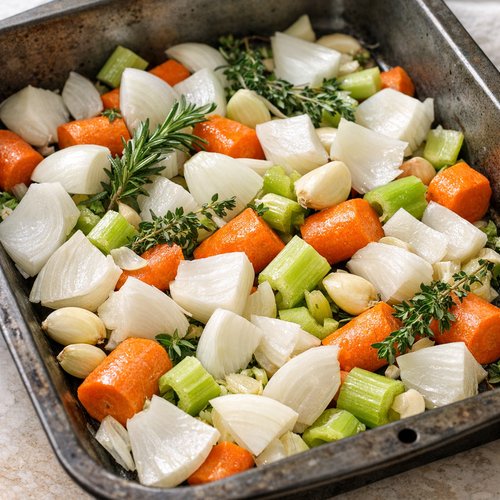
Carefully position your turkey on top of the rack, breast-side up. This positioning is critical for visual appeal—the breast faces up, presenting that gorgeous golden skin to anyone carving at the table. Stuff the squeezed lemon halves (the ones you’ve already used for juice) deep into the turkey cavity, along with the fresh thyme sprigs and any herb stalks you reserved. Close the cavity loosely—these aromatics will infuse the meat during cooking.
Step 4: Apply Herb Butter Under the Skin (25 Minutes Before Cooking)
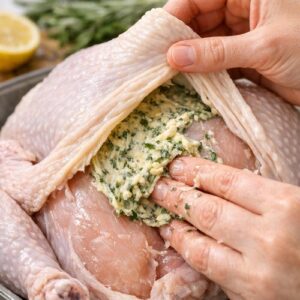
This step is where visual beauty truly develops. Carefully lift the skin away from the turkey breast again—it should lift easily now that the skin has dried slightly. Spoon approximately 4 tablespoons of your herb butter directly onto the breast meat beneath the skin. Using your fingers (clean hands work best), massage the butter gently across the breast meat, spreading it as evenly as possible. You’ll see the herbs distribute under the semi-translucent skin, creating a subtle green marbling effect.
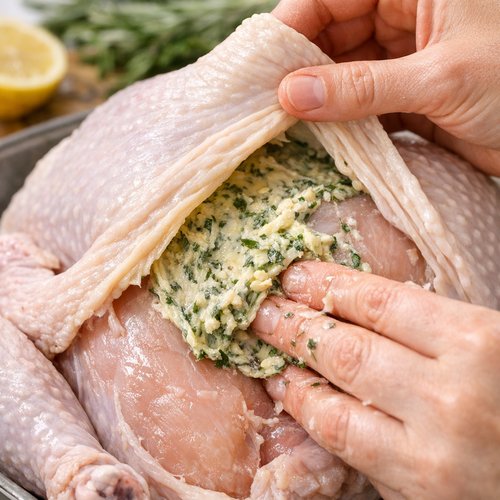
Now take most of your remaining herb butter and brush it all over the exterior of the turkey—breast, thighs, legs, everywhere. Reserve about 2 tablespoons for basting later. Pay special attention to the thighs and legs, which benefit from extra fat for browning. For a neat, professional finish, tie the wings and legs to the body using kitchen twine. This creates a compact, beautiful silhouette and ensures even cooking.
Step 5: The Initial High-Heat Roast (First 2 Hours)
Place your turkey in the oven at 240°C and immediately reduce the temperature to 180°C (160°C fan) or gas mark 4. We’re going to roast for 2 hours total, with strategic basting every 30 minutes. After the first hour, remove the turkey from the oven and brush it generously with the reserved herb butter. Notice how the skin is already developing that golden-brown color—this is the Maillard reaction creating flavor and visual appeal simultaneously.
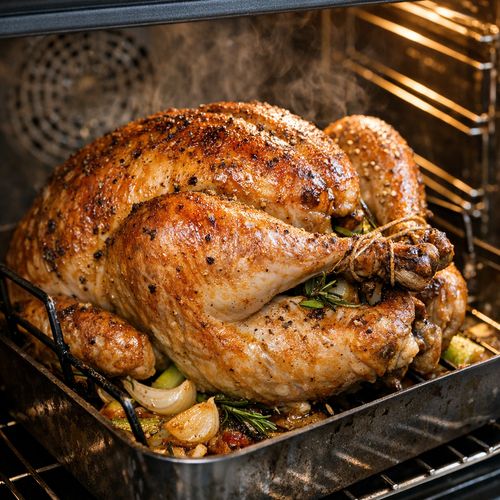
Rotate your roasting tin 180 degrees (this ensures even heat distribution) and return to the oven for another 30 minutes. Baste again with remaining butter. Roast for the final 30 minutes. This rhythm of basting creates multiple layers of caramelization, which builds deeper color and prevents dry skin. You’re building visual richness with each baste.
Step 6: Check Temperature and Rest (Temperature Check at 2 Hours)
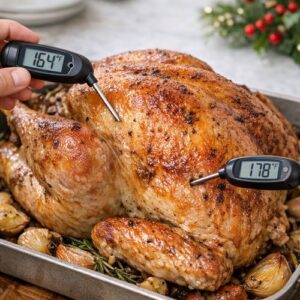
At the 2-hour mark, insert a meat thermometer into the thickest part of the breast (not touching bone) and the thickest part of the thigh. You’re aiming for 65°C in the breast and 75°C in the thigh. If either is lower, return the turkey to the oven for 15-minute increments until you reach target temperature. Once you’ve hit your target, remove the turkey from the oven and let it cool for 10 minutes on the rack.
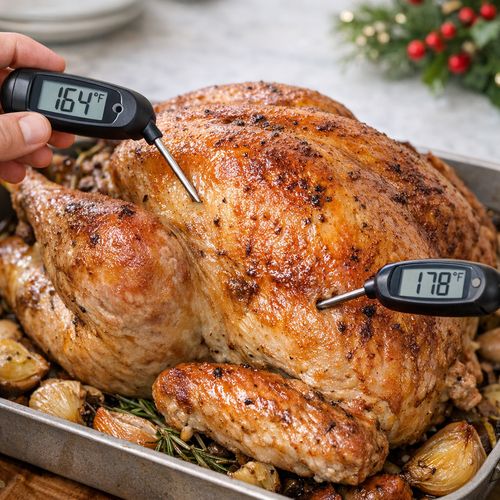
Here’s the insider tip from my years preparing holiday meals: transfer the turkey to a cutting board and position it breast-side down for the resting period. This inverted position allows the juices to redistribute back toward the breast meat, ensuring maximum juiciness at carving time. Let it rest for at least 20 minutes—it will stay hot for 40 minutes or more. During this time, make your gravy (see step below), and your turkey reaches absolute perfection.
Step 7: Create Your Gravy (While Turkey Rests)
If your roasting tin is flameproof (most modern ones are), place it directly over medium heat on your stovetop. If not, carefully transfer the pan contents to a large, shallow skillet. You’ll have caramelized vegetables and the turkey giblets in the bottom, along with rendered fat and the pan drippings—this is liquid gold for gravy. Sprinkle your flour over the contents and stir constantly, creating a paste that coats the bottom of the pan. This roux captures all the savory flavor.
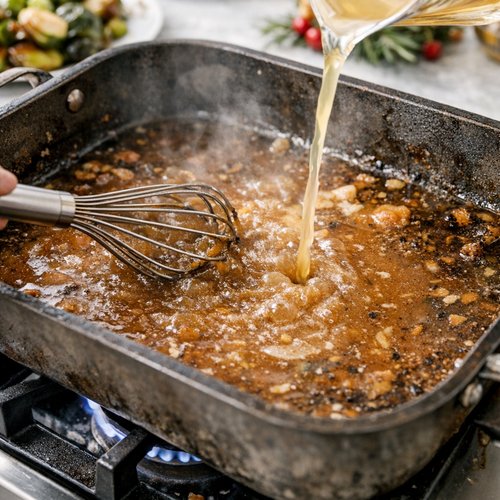
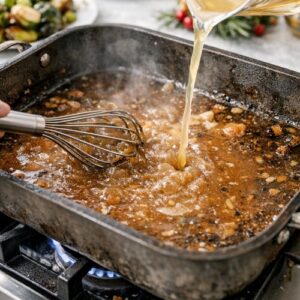
Add your soy sauce and yeast extract, stirring to incorporate completely. Pour in your red wine—it will sizzle and deglaze the pan, lifting all the flavorful browned bits from the bottom. Stir constantly until you’ve formed a thick paste. Slowly pour in your stock and any turkey juices that accumulated on the resting board. Simmer for about 5 minutes, stirring frequently, until your gravy is rich, glossy, and deep bronze in color. Strain it through a fine mesh sieve into a warm jug or saucepan for serving. This gravy, with its luxurious color and silken texture, elevates your presentation from good to extraordinary.
The Plating Masterclass
Carving and presenting this turkey is your moment to shine. I approach plating like I’m honoring the bird’s journey from farm to table. The presentation should celebrate that beautiful golden skin and the juicy meat beneath it, while the gravy ties everything together visually and sensorially.
- The Transfer to Platter – Using two sturdy forks or carving tools, carefully transfer your rested turkey to a large wooden or ceramic platter. Position it breast-side up, slightly off-center to allow space for garnish. The platter becomes a frame for your edible centerpiece, so choose one in warm, neutral tones that complement the turkey’s golden skin.
- Strategic Garnish Placement – Tuck fresh thyme sprigs and small parsley leaves around the turkey’s base—these create height variation and direct the eye upward toward the bird. Scatter any roasted carrot pieces and onion pieces around the turkey; their caramelized color echoes the turkey skin and creates visual harmony.
- Sauce Application – Pour a portion of your gravy around the turkey base rather than over it. Let some pool naturally on the platter—this creates visual movement and invites the eye to travel around the presentation. The bronze gravy against the white platter and golden turkey skin creates professional color contrast.
Photography Tips for This Dish
If you’re capturing this for your own memory or social sharing, timing and lighting matter tremendously. Photograph immediately after plating, while the skin still has a subtle sheen and the steam is still rising slightly from the cavity.
- Natural Light Window – Position your platter near a north-facing window for soft, diffused light that brings out the golden skin tones without creating harsh shadows. If you’re photographing an evening meal, use a simple white reflector (a foam board or white sheet) opposite the light source to bounce light back onto the darker thigh areas.
- Angle Matters – Shoot from a 45-degree angle slightly above the platter, capturing the rounded breast and the height of the presentation while still showing the detail of the herb garnish and gravy pool. Avoid directly overhead shots, which flatten the visual impact of the turkey’s three-dimensional form.
- Prop Strategically – Include the gravy boat slightly out of focus in the background, or position a single carving knife across the lower edge of the platter. These elements tell the story of the meal about to unfold without competing for visual attention.
Seasonal Color Variations
This Christmas turkey recipe adapts beautifully throughout the year. In spring, I swap the fresh thyme and parsley for tarragon and chervil, which are brighter and more delicate. The herb butter becomes nearly silver-green, creating a fresh aesthetic. For autumn entertaining, I add crushed sage leaves and dried cranberries to the herb butter mixture—the cranberries add unexpected pops of deep red color visible under the skin. Summer versions work well with fresh oregano, basil, and lemon zest for a Mediterranean twist. The cooking method stays identical; only your herb selection changes. This flexibility means you can feature this recipe year-round, adapting it to whatever fresh herbs thrive in your region.
Can I Store Christmas Turkey Recipe?
Absolutely, and I’ve learned valuable storage tricks from years of working with Alaska’s precious wild salmon and proteins. Let your cooked turkey cool completely to room temperature (about 1 hour), then carve it if desired or keep it whole. Store on a covered platter or in an airtight container in the refrigerator for up to 3 days. The meat actually becomes more flavorful on day two as the seasoning continues to permeate the muscle fibers.
For longer storage, wrap individual portions in parchment paper first, then aluminum foil, and freeze for up to 3 months. The parchment prevents freezer burn while allowing the meat to release moisture without it accumulating on the surface. Your gravy can be stored separately in an airtight container in the fridge for 4 days or frozen for 3 months. Pro tip: freeze gravy in ice cube trays, then transfer the cubes to freezer bags. You can thaw exactly the amount you need without opening the whole container.
To reheat while preserving that beautiful appearance, warm carved turkey gently in a low oven (120°C) covered with foil until just heated through—this prevents moisture loss and keeps the meat visually moist. Reheat your gravy on the stovetop over medium-low heat, stirring occasionally, adding a splash of stock if it thickens too much.
Nutrition Information
Turkey is one of nature’s more underrated proteins. A 150-gram serving of roasted turkey breast (without skin) provides approximately 35 grams of complete protein, only 1.5 grams of fat, and about 185 calories. The darker meat from the thighs offers more iron and zinc—nutrients especially important in winter months when we’re less likely to be foraging wild salmon and other nutrient-dense proteins. According to USDA nutrition data, the herb butter and skin do add fat content (about 5-7 additional grams of fat per serving), but these fats are vehicle for fat-soluble vitamins and create the satiety that prevents overeating.
The fresh herbs—parsley and thyme—are concentrated sources of antioxidants and volatile compounds. While they’re present in small quantities, they contribute meaningful vitamins K, A, and C. The lemon adds citric acid, which enhances iron absorption from the turkey meat itself (a critical consideration for plant-based eaters at this meal, and helpful for everyone). The vegetables in your gravy (onion, carrot) provide fiber and additional micronutrients, while the red wine brings resveratrol and other polyphenols. This is food medicine disguised as celebration.
Expert’s Nutritional Tip
Here’s what I’ve learned working with Alaska’s wild proteins: the skin contains collagen and fat-soluble vitamins that support joint and skin health, especially important if you live in a climate with long, dark winters. Don’t remove the skin—embrace it. The herb butter under the skin keeps the meat moist while adding minimal additional fat compared to traditional preparations. The real secret to healthy holiday eating isn’t deprivation; it’s cooking with intention so one serving truly satisfies. I’d rather see someone enjoy 150 grams of herb-butter turkey with its skin than have them pick at 200 grams of dried, skinless breast while eyeing the dessert table.
Make-Ahead Guide
This recipe is designed for advance preparation, which means you can actually enjoy your guests instead of being stuck in the kitchen. Here’s my timeline for a Christmas dinner at 6 PM:
- 48 Hours Before (Thursday): Purchase your turkey and begin the dry-brine process. Wash and chop your herbs, storing them in an airtight container in the refrigerator. Peel and grate your garlic. Chop your onion and carrots, storing in separate containers. These ingredients will keep beautifully for 48 hours and are ready to go.
- 24 Hours Before (Friday): Pull your turkey from the fridge, verify it’s seasoned properly, and return it to its uncovered position in the refrigerator. Make any final adjustments to your platter or table setting. Your turkey is now in its final resting period, developing that incredible skin.
- 1 Hour Before Cooking: Remove the turkey from the refrigerator. Prepare your herb butter and let it cool. Preheat your oven 15 minutes before the turkey goes in. Have your gravy ingredients measured and ready in small bowls.
- During Cooking: While your turkey roasts, set your table, prep your side dishes, and focus on enjoying your guests. The turkey is doing the work.
Common Mistakes to Avoid
I’ve made every mistake you might imagine and learned from each one. Here are the pitfalls that trip up home cooks, and how to sidestep them:
- Starting with a Cold Bird: Resist the urge to cook straight from the fridge. A cold turkey will have an extended cooking time with uneven results and dry exterior. Always remove from refrigeration at least 1 hour before cooking. Your meat needs to be closer to room temperature for even cooking from center to surface.
- Skipping the Dry Brine: Salt sitting on the turkey’s surface only creates an unpleasant crust. The 48-hour salting period allows salt to penetrate the meat, season it throughout, and help denature muscle proteins so they retain moisture during cooking. Don’t skip this step thinking you’ll salt at the table. It’s not the same.
- Over-Basting or Basting with Cold Butter: Frequent opening of the oven door drops temperature dramatically and extends cooking time. Stick to the three basting points I’ve outlined. Ensure your butter is warm when you apply it—cold butter will shock the skin and prevent proper browning. Melt your butter fresh each time you baste, or keep it warm in a small bowl.
- Cutting into the Turkey Immediately: This releases precious juices that belong in the meat. The 20-minute minimum rest period (I prefer 30-40 minutes) allows muscle fibers to relax and reabsorb juices. If you carve too early, you lose moisture and end up with drier meat that looks less appetizing on the platter.
What to Serve Alongside for a Complete Visual Spread
A stunning turkey deserves equally beautiful supporting dishes. I think about color and texture balance when planning my table. Alongside this golden bird, I feature roasted root vegetables (which echo the turkey’s caramelized tones), fresh-steamed green vegetables (for color contrast and nutritional balance), and a vibrant cranberry sauce.
For a lighter accompaniment that complements the richness of herb butter and gravy, I often turn to my favorite salad tossed with winter greens like endive and radicchio. The sharp, slightly sweet dressing cuts through the richness while the bitter greens provide palate cleansing. For a completely different approach, Cheerios Recipe Healthy might seem like an odd recommendation, but a crunchy grain-based component can add textural interest to your table if you’re serving family with varied palate preferences.
- Roasted Root Vegetables (carrots, parsnips, Brussels sprouts) – The caramelized exteriors echo your turkey’s golden-brown skin while the roasted interiors provide creamy textural contrast. The natural sugars concentrate during roasting, creating gorgeous color depth and complementary flavor.
- Creamed Celery Root or Mashed Potatoes – A pale, creamy component creates visual balance against the darker turkey skin. The smoothness of the preparation contrasts beautifully with crispy turkey skin.
- Cranberry Sauce – Deep crimson or jewel-toned, this sweet-tart element adds visual drama and flavor complexity. A homemade version with whole berries creates more visual texture than smooth sauce.

Christmas Turkey Recipe
Ingredients
Method
- Remove your turkey from its packaging and pat it completely dry with paper towels—moisture is the enemy of crispy skin. This is where the visual magic begins. Gently lift the skin away from the breast meat with your fingers, working carefully to create a pocket between skin and meat on both sides. Work your way down toward the thighs if you can, but the breast is your priority. Once you've loosened the skin, sprinkle 2 teaspoons of fine sea salt evenly over the exposed meat, then pull the skin back down and smooth it carefully. Season the entire exterior of the bird with additional salt, paying special attention to the thighs and the area where wings meet breast (these darker meat zones need more seasoning for proper flavor penetration). Place the bird breast-side up on a large roasting tin with raised sides—this becomes your roasting vessel. Leave it uncovered in the refrigerator. The uncovered time allows the skin to air-dry slightly, which is your secret weapon for achieving that crackling golden exterior. Your turkey is now seasoning and drying simultaneously, building incredible flavor throughout the meat.
- Remove your turkey from the refrigerator and place it on the counter to bring it closer to room temperature—this ensures more even cooking. While the turkey rests, prepare your herb butter. In a small saucepan over low heat, melt your butter gently. Once melted, add your grated garlic, chopped parsley, thyme leaves, and torn bay leaf pieces. Let this mixture sizzle gently for exactly one minute—this releases aromatic oils without cooking off the fresh herb color. Squeeze your lemon juice into the mixture, stir once, then remove from heat and set aside to cool slightly. You'll notice the herbs retain their vibrant green color and the garlic becomes fragrant without browning. This is exactly what you want. Preheat your oven to 240°C (220°C fan) or gas mark 9. This high temperature will be used briefly to start the browning process, then we'll reduce it for gentle cooking. Think of it like how salmon cooks on Alaskan cedar planks—we start hot to create that caramelized exterior, then shift to gentle heat for moisture retention.
- Remove the turkey from the roasting tin and set it temporarily on a clean surface. Scatter your roughly chopped onion, carrot pieces, and the chopped turkey neck into the bottom of your roasting tin. These become your flavor foundation and will eventually enrich your gravy with deep, roasted vegetable notes. Place a sturdy roasting rack, trivet, or ovenproof cooling rack directly into or over your roasting tin. This elevates your turkey above the vegetables, allowing air to circulate underneath for even browning. Carefully position your turkey on top of the rack, breast-side up. This positioning is critical for visual appeal—the breast faces up, presenting that gorgeous golden skin to anyone carving at the table. Stuff the squeezed lemon halves (the ones you've already used for juice) deep into the turkey cavity, along with the fresh thyme sprigs and any herb stalks you reserved. Close the cavity loosely—these aromatics will infuse the meat during cooking.
- This step is where visual beauty truly develops. Carefully lift the skin away from the turkey breast again—it should lift easily now that the skin has dried slightly. Spoon approximately 4 tablespoons of your herb butter directly onto the breast meat beneath the skin. Using your fingers (clean hands work best), massage the butter gently across the breast meat, spreading it as evenly as possible. You'll see the herbs distribute under the semi-translucent skin, creating a subtle green marbling effect. Now take most of your remaining herb butter and brush it all over the exterior of the turkey—breast, thighs, legs, everywhere. Reserve about 2 tablespoons for basting later. Pay special attention to the thighs and legs, which benefit from extra fat for browning. For a neat, professional finish, tie the wings and legs to the body using kitchen twine. This creates a compact, beautiful silhouette and ensures even cooking.
- Place your turkey in the oven at 240°C and immediately reduce the temperature to 180°C (160°C fan) or gas mark 4. We're going to roast for 2 hours total, with strategic basting every 30 minutes. After the first hour, remove the turkey from the oven and brush it generously with the reserved herb butter. Notice how the skin is already developing that golden-brown color—this is the Maillard reaction creating flavor and visual appeal simultaneously. Rotate your roasting tin 180 degrees (this ensures even heat distribution) and return to the oven for another 30 minutes. Baste again with remaining butter. Roast for the final 30 minutes. This rhythm of basting creates multiple layers of caramelization, which builds deeper color and prevents dry skin. You're building visual richness with each baste.
- At the 2-hour mark, insert a meat thermometer into the thickest part of the breast (not touching bone) and the thickest part of the thigh. You're aiming for 65°C in the breast and 75°C in the thigh. If either is lower, return the turkey to the oven for 15-minute increments until you reach target temperature. Once you've hit your target, remove the turkey from the oven and let it cool for 10 minutes on the rack. Here's the insider tip from my years preparing holiday meals: transfer the turkey to a cutting board and position it breast-side down for the resting period. This inverted position allows the juices to redistribute back toward the breast meat, ensuring maximum juiciness at carving time. Let it rest for at least 20 minutes—it will stay hot for 40 minutes or more. During this time, make your gravy (see step below), and your turkey reaches absolute perfection.
- If your roasting tin is flameproof (most modern ones are), place it directly over medium heat on your stovetop. If not, carefully transfer the pan contents to a large, shallow skillet. You'll have caramelized vegetables and the turkey giblets in the bottom, along with rendered fat and the pan drippings—this is liquid gold for gravy. Sprinkle your flour over the contents and stir constantly, creating a paste that coats the bottom of the pan. This roux captures all the savory flavor. Add your soy sauce and yeast extract, stirring to incorporate completely. Pour in your red wine—it will sizzle and deglaze the pan, lifting all the flavorful browned bits from the bottom. Stir constantly until you've formed a thick paste. Slowly pour in your stock and any turkey juices that accumulated on the resting board. Simmer for about 5 minutes, stirring frequently, until your gravy is rich, glossy, and deep bronze in color. Strain it through a fine mesh sieve into a warm jug or saucepan for serving. This gravy, with its luxurious color and silken texture, elevates your presentation from good to extraordinary.
Notes
FAQs
How do I know when my turkey is perfectly cooked without a thermometer?
While a thermometer is genuinely the most reliable method, you can check doneness by piercing the thickest part of the thigh with a skewer. Clear juices (not pink) indicate doneness. The thigh meat should shred easily when pressed with a fork. However, I always recommend investing in an instant-read thermometer—they’re inexpensive and eliminate guessing. The visual cues can be deceiving, and an overcooked turkey (even slightly) appears dry on the platter no matter how you plate it.
Why is my turkey skin not as golden as I want it to be?
The issue is almost always insufficient butter basting or oven temperature that’s too low. Ensure you’re basting with melted (not cold) butter every 30 minutes. Verify your oven temperature with a separate oven thermometer—many ovens run 10-15 degrees cooler than displayed. Also, ensure your turkey has air circulation underneath via the roasting rack. Any contact between the breast and the pan bottom will prevent browning there. Finally, make sure your turkey started completely dry—any moisture on the skin prevents the Maillard reaction that creates that beautiful golden color.
Can I prep the herb butter the night before?
Absolutely. Make your herb butter and store it in an airtight container in the refrigerator overnight. Before cooking, let it soften slightly at room temperature for about 10 minutes so it’s spreadable but still cool. You can actually make it 2-3 days ahead if needed. Store it on a piece of parchment paper so you can easily access it without getting your fingers messy right before cooking.
My turkey is browning too quickly on the breast but the legs aren’t done—what do I do?
This is a common issue with large turkeys. If the breast is browning too quickly while thighs still need cooking, create a loose tent of aluminum foil over just the breast area, leaving the thighs exposed. This shields the breast from direct heat while the thighs continue to cook. Check underneath the foil occasionally to ensure the skin is still crisping nicely, and remove the foil during the final 15 minutes to complete the browning process.
Can I make this recipe with a smaller turkey or turkey breast?
Yes, absolutely. For a 2-3 kg turkey, reduce all cooking times by about one-third. A 1.5-2 kg turkey breast alone will cook in about 1 hour at the temperatures specified. The same dry-brine, herb butter, and resting principles apply. The visual appeal translates beautifully to smaller portions—in fact, individual turkey portions plated with the same herb garnish and gravy can be stunning for intimate dinners.
More Visually Stunning Recipes
- Bravo Sauce Recipe – A vibrant, herbaceous sauce that rivals any traditional gravy and brings fresh color to holiday plates
- this cozy soup – Light, aromatic, and visually striking with fresh herbs and bold color contrasts
Final Thoughts
This Christmas turkey recipe represents everything I believe about wholesome, intentional cooking. It’s not complicated, but it is precise. It asks you to plan ahead, respect your ingredient, and take time over the process. When you do, something magical happens: a bird emerges from the oven that’s simultaneously beautiful and delicious, impressive and achievable. You’ll feed both eyes and souls simultaneously, which is really what holiday cooking is all about.
I think back to that golden turkey from my grandfather’s cabin, the way my cousins’ faces changed when they saw it—that’s the gift you’re creating when you make this recipe. You’re creating a moment before the meal even begins. That’s the real magic.
Happy Cooking!